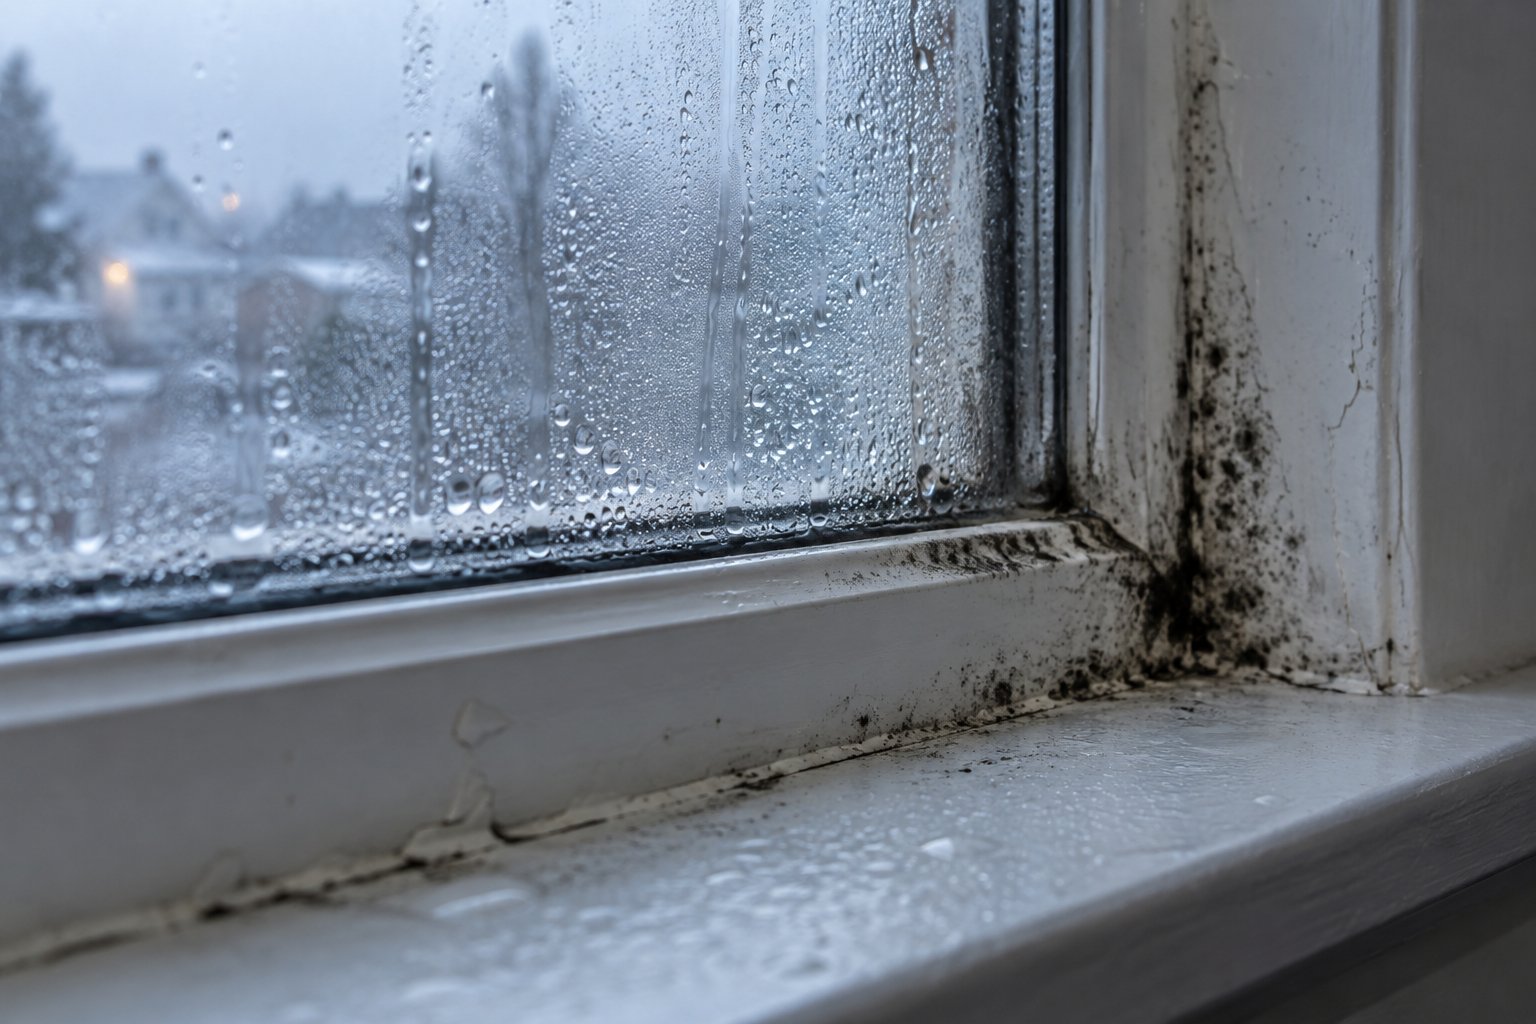
Imagine pulling back the curtains on a cold morning and spotting dark, speckled patches creeping along the window sill and into the corners of the frame. It looks alarming, and your first thought might be "toxic black mould." You're not alone - black mould on windows is one of the most common household complaints, especially during the colder months. But before you panic, it helps to understand exactly what you're looking at.
When most people say "black mold on windows," they're using an umbrella term for any dark fungal growth near their glazing. The species they usually fear - Stachybotrys chartarum, the one behind the "toxic black mould" headlines - actually requires chronically wet cellulose materials like drywall or wallboard to thrive. It rarely colonises window zones. The dark growth you'll find on sills, seals, and frames is far more likely to be Aspergillus niger, Cladosporium, or Penicillium. According to the CDC, Cladosporium, Penicillium, and Aspergillus are among the most common indoor moulds - and all three can appear black or dark green on window surfaces.
Mould is a living fungus that reproduces by releasing microscopic spores into the air. These spores are everywhere, indoors and out, but they only develop into visible colonies when four conditions align: persistent moisture, an organic food source (even a thin layer of household dust will do), still air with poor circulation, and temperatures between roughly 4-30 °C. Window zones tick every box. Cold glass chills warm indoor air, condensation pools on sills and seals, dust settles in corners, and curtains or blinds restrict airflow. It's the ideal habitat - which is why signs of black mold on window sills appear so frequently in homes across the country.
Not every dark mark on your window frame is mould. Black dust on window sill surfaces can come from traffic pollution, candle soot, or simple household grime. Brown stains on window sill areas are often old condensation marks left behind as water repeatedly pools and evaporates. Here's a quick way to tell the difference: grab a damp cloth and wipe the spot. Dirt and soot lift away cleanly. Mould resists the wipe, smears, or leaves a shadow behind - and it often carries a distinctive musty odour that plain grime does not.
Brown spots on window frames can be particularly confusing because they may indicate early-stage fungal colonisation rather than fully developed mould. If the discolouration returns after cleaning, you're almost certainly dealing with a living organism, not a stain.
Use these three quick checks to identify what you're seeing:
Correctly identifying the problem is the essential first step - because mould and dirt demand very different responses. And if what you're seeing really is fungal growth, the critical question shifts from "what is it?" to "why is it here?"

The answer almost always traces back to moisture - specifically, where it comes from, why it lingers, and what stops it from escaping. Understanding the causes of black mold on window sills is what separates a one-time fix from an endless cycle of scrubbing and re-scrubbing. Mould is a symptom, not a standalone problem, and its favourite breeding ground is any surface that stays damp long enough for spores to take hold.
Picture a cold glass of water on a warm day - droplets form on the outside almost immediately. Your windows work the same way. Warm, moisture-laden air inside the house drifts toward the coldest surface it can find, which is nearly always the glass pane. When that air cools below its dew point temperature, water vapour condenses into liquid droplets that trickle down and pool on sills and seals. This is mold on windows from condensation in its simplest form.
Where does all that indoor moisture come from? Everyday life. Cooking a meal on the hob, running a hot shower, boiling the kettle, even breathing - a household of four can generate several litres of water vapour every single day. Add drying laundry on radiators, a common habit during colder months, and the moisture load climbs sharply. Each of these activities pushes warm, humid air into rooms where it eventually meets cold glazing and surrenders its moisture right onto your window surfaces.
The critical point is that mold from window condensation does not need a flood or a leak. It only needs that slow, daily drip of condensation to keep sills and seals permanently damp - the perfect feast for fungal colonies.
Here's the paradox. Modern draught-proofing, sealed double glazing, and improved insulation are brilliant at keeping heat in and energy bills down. But they also trap moisture inside. Older, draughtier homes allowed air to escape through gaps around frames, floors, and loft spaces - an accidental ventilation system that kept humidity in check. Today's tighter building envelopes eliminate those escape routes.
As Build Review highlights, the push for energy efficiency has created an unintended consequence: moisture entrapment. Without adequate background ventilation, relative humidity indoors can climb well above the 60-70% threshold where mould thrives. The result? Condensation and mould on windows become virtually inevitable, even in well-maintained properties. The home stays warm and draught-free, but the air inside grows steadily damper with nowhere to go.
This isn't just a problem in new builds, either. Retrofitted draught-stripping and replacement sealed-unit windows in older homes can create the same mold condensation windows issue - better thermal performance paired with worse moisture management.
If you've noticed that condensation and mold on windows flare up between October and March, there's a clear scientific reason. Colder exterior temperatures widen the temperature differential across your glazing, meaning the inner pane gets colder and condensation forms more readily. At the same time, heating systems warm the indoor air, increasing its capacity to hold moisture. And because nobody wants to open a window in freezing weather, that humid air stays trapped inside, depositing moisture on glass night after night.
Spring and summer bring relief - warmer outdoor temperatures shrink the differential, and homeowners naturally ventilate more by opening windows. But the respite is temporary. The table below maps how condensation risk shifts through the year, along with the typical causes and practical responses for each season.
| Season | Condensation Risk | Typical Causes | Recommended Response |
|---|---|---|---|
| Spring | Low to moderate | Residual indoor dampness from winter; occasional cool nights | Open windows regularly; wipe any remaining condensation; check seals for mould |
| Summer | Low | Minimal temperature differential; natural ventilation through open windows | Inspect and clean window seals; repair or replace damaged silicone |
| Autumn | Moderate to high | Falling outdoor temperatures; windows closed more often; indoor drying of laundry begins | Use extractor fans consistently; avoid drying clothes on radiators near windows; begin daily condensation wipe-downs |
| Winter | High | Large temperature differential across glazing; heating raises indoor humidity; minimal natural ventilation | Run dehumidifiers in problem rooms; maintain low consistent heating; ensure trickle vents are open; wipe condensation every morning |
The seasonal cycle makes one thing clear: black mould on windows is not a cleaning failure. It is a moisture-ventilation imbalance built into the way most homes operate, and it intensifies during the months when people are least inclined to let fresh air in. Treating it purely as a surface problem - scrubbing and bleaching without addressing the underlying dampness - guarantees it will return.
That persistent dampness doesn't just damage your sills and frames, though. It also quietly affects something far more important - the air you breathe every day inside your own home.
A few dark patches on a window sill might look like nothing more than a cosmetic nuisance. But every visible colony is quietly releasing thousands of microscopic spores and chemical byproducts into your room's air. Those particles don't stay on the sill - they circulate, settle on bedding, and get inhaled with every breath. Understanding the health dimension of black mold on window sill growth is what turns casual concern into meaningful action.
Mould reproduces by releasing airborne spores, and many species also produce microbial volatile organic compounds (mVOCs) - the chemicals responsible for that unmistakable musty smell. When inhaled, these particles can provoke a genuine immune response. Cleveland Clinic notes that common symptoms of mould exposure include sneezing, persistent coughing, nasal congestion, eye irritation, and skin rashes. For people with mould allergies, the reaction can begin within minutes of contact as the immune system releases histamine and other inflammatory chemicals.
Here's what many homeowners don't realise: you don't need the feared Stachybotrys chartarum to experience these problems. The species most commonly found on windows - Aspergillus niger, Cladosporium, and Penicillium - are all capable of triggering allergic rhinitis, wheezing, and irritation of the eyes, nose, throat, and lungs. The CDC confirms that mould can cause irritation even in people who are not allergic to it. So the question of whether black mold in window sill areas is dangerous isn't just about toxicity - it's about the cumulative irritant load your respiratory system handles day after day.
What often starts as mildew on window sills that seems barely worth mentioning can, over weeks and months, develop into a persistent source of airborne irritants that affect the whole household.
While mould spores bother most people to some degree, certain groups face a disproportionately higher risk:
Bedroom exposure deserves special attention. You spend roughly a third of every day sleeping, often with your head at sill level and the window closed. If black mold in window frames is present in a bedroom, the sleeper inhales spores continuously throughout the night in a poorly ventilated micro-environment - the longest single stretch of exposure in any 24-hour period. For children whose beds sit directly beneath a window, the concern is even greater.
Mild, occasional sneezing near a mouldy window doesn't necessarily require a doctor's visit. But certain patterns should prompt you to consult a healthcare professional without delay:
A healthcare provider can run allergy tests - including skin prick tests or blood IgE tests - to determine whether mould is the trigger. For people with worsening asthma, pulmonary function tests may reveal a direct connection between their home environment and declining lung performance.
Mould on a window sill is not just a cosmetic issue - it is an indoor air quality problem that can affect respiratory health, sleep quality, and everyday comfort for everyone in the household.
The health stakes make one thing clear: ignoring mould or treating it as a minor cleaning chore isn't a safe strategy. But before reaching for a spray bottle, it pays to gauge exactly how far the problem has spread - because a small surface patch and deep structural penetration call for very different responses.
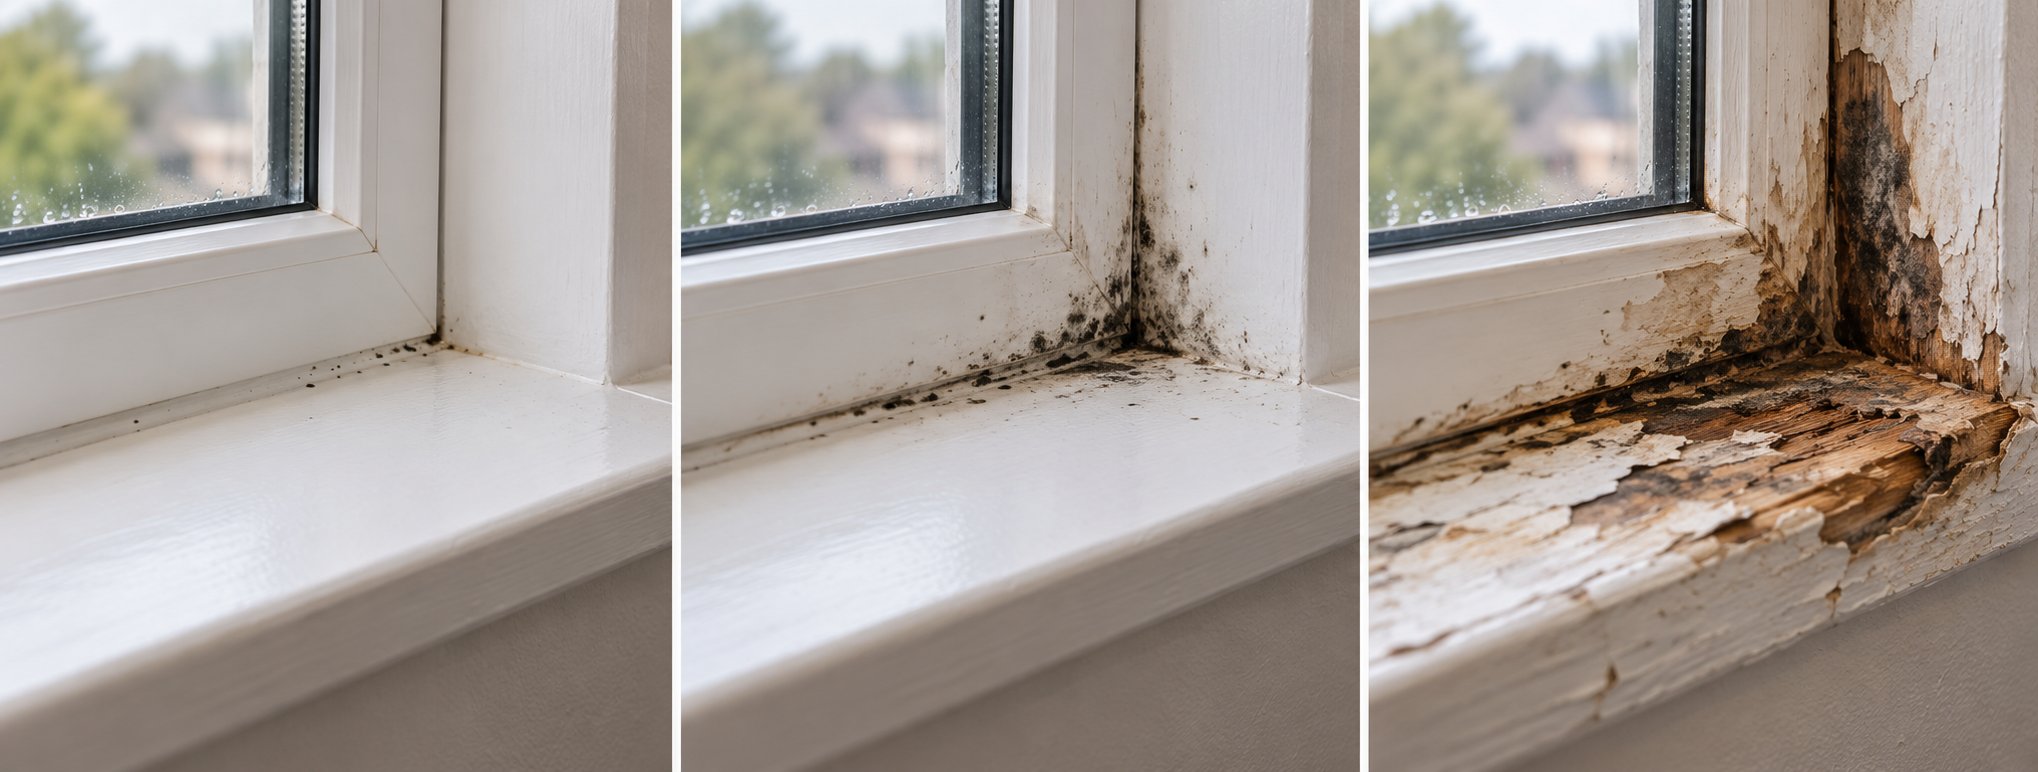
A thumbnail-sized spot of mould on a rubber seal and a spreading colony that has softened an entire timber frame are worlds apart - yet many homeowners reach for the same bottle of bleach regardless. Reacting without first gauging the scale of the problem can mean wasting effort on a situation that needs professional intervention, or calling out an expert for something a cloth and some vinegar could handle in five minutes. The smarter approach? Assess severity first, then match your response.
The framework below breaks mould on window sill areas into three clear levels. Think of it as a triage system: identify which category your situation falls into, and the right course of action follows naturally.
This is the earliest and most manageable stage. You'll notice small, isolated spots - often just a few millimetres across - sitting on the glass, the sill surface, or along rubber gaskets and seals. The growth sits on top of the material rather than inside it. A firm wipe with a damp cloth removes most of it, though a faint shadow may remain on lighter surfaces. Any musty odour is either absent or barely detectable when you lean in close.
Mild surface mould is the kind most homeowners encounter during autumn and winter when condensation builds overnight. It's common, it's not structurally damaging, and it responds well to straightforward DIY cleaning combined with small ventilation improvements - opening trickle vents, wiping condensation each morning, and allowing air to circulate across the glazing.
At this stage, the problem has graduated from isolated specks to visible patches. Mould on windowsill frames, reveals, and silicone seals covers a broader area, often reappearing within days or weeks of cleaning. You might see dark streaks along grout lines, discolouration spreading across painted reveals, or black mould in window sills that no longer wipes away cleanly. A noticeable musty smell lingers in the room, particularly when curtains or blinds are drawn and airflow is restricted.
The defining characteristic of moderate mould is recurrence. If you've cleaned the same spot two or three times and it keeps returning, the underlying moisture source hasn't been addressed. At this level, effective action involves two things in parallel: a thorough clean with an appropriate agent - vinegar, hydrogen peroxide, or a specialist mould remover - and a genuine investigation into why moisture keeps feeding the growth. Is the room poorly ventilated? Is a trickle vent sealed shut? Is laundry regularly dried beside the window? Solving the moisture equation is just as important as scrubbing the surface.
This is the level that moves beyond DIY territory. Severe mould has penetrated into porous materials - timber frames feel soft or spongy when pressed, plaster reveals crumble or show dark staining beneath the paint surface, and growth may be visible behind the frame or extending into the surrounding wall cavity. The screwdriver test is a practical way to check: press the tip gently into a suspect timber sill, and if it sinks easily or the wood yields and crumbles, the fibres are already compromised. Coverage typically exceeds roughly one square metre, and the musty odour can be detected from the doorway rather than only at close range.
Black mould window sills at this stage often overlap with early wood rot, because the persistent dampness that feeds fungal colonies also triggers wood-destroying fungi in timber frames. Warping, swelling, or paint that blisters and peels away from the substrate are further warning signs. Professional assessment is essential here - remediation may involve containment, HEPA vacuuming, antimicrobial treatment, and replacement of damaged components such as sills, seals, or sections of timber framing.
Correctly assessing severity before acting saves time, money, and avoids making the problem worse - a surface wipe won't fix structural penetration, and a costly professional callout isn't necessary for a few spots on a rubber seal.
The table below pulls the framework together at a glance, so you can match what you're seeing on your windows to the appropriate response.
| Severity Level | Visual Signs | Smell Indicators | Material Penetration | Recommended Action |
|---|---|---|---|---|
| Mild | Small isolated spots on glass, sills, or rubber seals; easily wiped away | Faint or absent | None - mould sits on the surface only | DIY cleaning with household agents; improve daily ventilation habits |
| Moderate | Patches spreading across frames, seals, or reveals; visible on grout or silicone; recurs after cleaning | Noticeable musty odour in the room | Shallow - may be embedding into silicone or grout but not into structural material | Thorough cleaning with effective agents; identify and address the root moisture cause; monitor for recurrence |
| Severe | Widespread coverage exceeding approx. 1 m²; dark staining beneath paint; warping or softening of timber; growth behind frames or into wall cavities | Strong musty smell detectable from the doorway | Deep - mould has penetrated timber grain, plaster, or cavity spaces | Professional assessment and remediation; possible component replacement; address structural moisture ingress |
Take a moment to compare what you see on your windows against these three levels. If your situation falls into the mild or moderate category, the right cleaning method and a well-chosen agent can make a genuine difference - provided you match the approach to the material you're working on and follow a process that actually kills the mould rather than just smearing it around.
Matching the severity level to the right response is half the battle. The other half is executing the clean properly - because a careless approach can spread spores to unaffected surfaces or damage the very materials you're trying to save. Whether you're tackling a few spots on a rubber gasket or cleaning mold from windows across an entire frame, the method matters as much as the product you choose.
Mould releases spores the moment you disturb it. Without basic protection, a well-intentioned clean can turn into an accidental inhalation event. The U.S. EPA recommends minimum personal protective equipment of gloves, goggles, and an N95 respirator even for small remediation areas under 10 square feet. For window mould removal at home, equip yourself with:
Bleach gets the most attention, yet it's rarely the best choice for every surface. Knowing how to clean mold from windows effectively means picking the agent that suits the material and the severity. The table below compares four widely available options so you can make an informed decision before you spray a single drop.
| Cleaning Agent | Surfaces It Suits | Dilution / Concentration | Dwell Time | Advantages | Limitations |
|---|---|---|---|---|---|
| White distilled vinegar | uPVC, glass, tiles, painted wood (patch-test first) | Undiluted (5% acetic acid) | 60 minutes | Non-toxic; no harsh fumes; effective against roughly 82% of mould species; leaves a mild residual anti-fungal effect | Less effective on deeply embedded growth; strong vinegar smell during application (dissipates within hours) |
| Hydrogen peroxide (3%) | Glass, uPVC, fabric blinds, silicone seals, painted surfaces | 3% solution (pharmacy grade), used undiluted | 10-15 minutes | Kills approximately 85% of species; no lingering odour; breaks down into water and oxygen; safe on most materials | Loses potency if stored in clear containers or left on a shelf too long; can lighten very dark fabrics |
| Diluted household bleach | Non-porous surfaces only: glass, ceramic tiles, metal | 1 part bleach to 10 parts water | 10-15 minutes | Strong surface-level kill on non-porous materials; inexpensive and widely available | Cannot penetrate porous materials - the water content can actually feed mould roots in wood and grout; damages silicone seals over time; may discolour timber and paint; produces irritating fumes |
| Specialist anti mold spray | Bathroom and window silicone, grout, tiles, uPVC | Ready to use (follow product label) | Varies by product (typically 15-30 minutes) | Formulated with surfactants that penetrate mould colonies; often includes residual protection to slow regrowth | Higher cost per use; some contain bleach-based ingredients (check labels); ventilation essential during use |
A general rule of thumb: vinegar or hydrogen peroxide should be your first choice for most window materials. Reserve bleach for non-porous surfaces like bare glass or ceramic tile, and consider a specialist anti mold spray when you're dealing with persistent silicone or grout contamination that milder agents haven't resolved.
Once you've suited up and selected your cleaning agent, follow this process to remove mold from window sills, seals, and frames without spreading spores to clean areas:
Even after the mould itself is dead, dark staining can remain - particularly on silicone seals and grout lines. This frustrates homeowners who expect a spotless finish, but here's the reality: porous silicone absorbs mould pigment deep into its structure, and no amount of scrubbing will always extract it. If you've the steps above and the surface is clean to the touch with no musty smell, the mould is killed even if a shadow lingers.
For silicone seals where staining simply won't shift, replacing the sealant entirely is often the only lasting cosmetic fix - cut out the old bead, treat the channel beneath with hydrogen peroxide, let it dry completely, and apply fresh anti-fungal silicone sealant. It's a straightforward DIY job and the most reliable way to how to remove mold from window sills that have deeply stained seals.
The key takeaway? Killing the mould matters more than removing every last trace of discolouration. A clean, dry, dead stain poses no health risk and won't release spores. A bright-white seal that's still damp, on the other hand, is just waiting for the next colony to move in.
Of course, how aggressively you scrub - and which agent you reach for - should also depend on what your window is actually made of. uPVC, timber, aluminium, and silicone each have their own tolerances and vulnerabilities, and a method that works perfectly on one material can damage another.

A single bottle of bleach and an old sponge might feel like a universal solution, but every mold on window frame situation is shaped by what that frame is made of. uPVC shrugs off treatments that would ruin timber. Aluminium laughs at scrubbing that scratches plastic. And silicone seals - the most stubborn battlefield of all - play by their own rules entirely. Matching your cleaning method to the material protects the surface, kills the growth, and avoids costly damage.
The good news with uPVC is that it's non-porous. Mould can't burrow into it the way it does with wood, so colonies sit on the surface and clean up relatively easily. White distilled vinegar sprayed on and left for an hour handles most cases. Hydrogen peroxide at 3% is equally effective and won't leave a lingering smell. For persistent patches on black mould on window frames made from uPVC, a dedicated mould-removal spray can penetrate surface biofilm more aggressively.
What you should avoid matters just as much. Abrasive scourers and steel wool scratch the smooth uPVC finish, creating micro-grooves where future spores can lodge and resist wiping. Solvent-based cleaners - white spirit, WD-40, and acetone-based products - can soften, warp, or permanently discolour uPVC. Fenea's managing director John Shaw specifically warns against glass cleaner, scouring powders, and cream cleaners for the same reason. Stick to soft cloths, nylon brushes, and gentle chemistry, and your frames will stay both clean and intact.
Mould on wooden window frames is a different challenge altogether. Timber is porous, which means fungal hyphae - the thread-like roots of the colony - can penetrate into the grain well below the painted or varnished surface. Wiping away what you can see may leave a thriving network hidden underneath, ready to re-emerge within weeks.
For light surface growth, vinegar or a specialist wood-safe mould remover cleans effectively without stripping the finish. Bleach is best avoided here: it can lift paint, lighten the natural wood tone, and the water content may actually feed mould deeper in the timber - the opposite of what you want.
Established growth calls for more involved work. After cleaning, lightly sand the bare timber with 120-grit sandpaper to remove the top layer where spores have embedded, then wipe away all dust. Apply a mould-resistant primer to seal the wood before finishing with two coats of durable enamel paint. This prep-prime-paint sequence doesn't just restore the appearance - it creates a protective barrier that makes it far harder for colonies to re-establish in the grain.
Can mold grow on glass and bare aluminium? Technically, mould needs organic material to feed on, and neither glass nor aluminium provides that. What actually happens is that household dust, skin cells, and cooking residue settle on these surfaces, and mould colonises that microscopic organic layer rather than the material itself. So while you might spot mold on glass panes or across aluminium profiles, the fungus is feeding on what's sitting on top, not the metal or glazing beneath.
This makes mold on metal window frames straightforward to clean. A mild detergent solution or undiluted white vinegar wiped across the aluminium surface removes both the organic film and the mould growing on it. The real focus, though, should be the rubber gaskets and thermal break areas - the components that sit within the aluminium frame but are made of softer, more porous materials. These seals and drainage channels collect moisture and trap debris, making them the true mould hotspots on an otherwise resilient frame type.
If there's one area that drives homeowners to frustration, it's mold on window seals. Silicone sealant is porous at a microscopic level, and mould spores burrow deep into its structure - far beyond what any surface wipe can reach. You clean it, it looks fine for a week, and then the dark streaks creep back. Sound familiar?
A paste of baking soda mixed with hydrogen peroxide (3%) offers the best DIY penetration. Spread it thickly over the affected seal, press cling film on top to keep it moist, and leave it for several hours - overnight if possible. The slow-release oxidising action reaches deeper into the silicone than a quick spray-and-wipe ever could. Scrub with an old toothbrush, rinse, and dry thoroughly.
If the mould returns within a few weeks despite proper cleaning and improved ventilation, the sealant itself has become the problem. As Silicone Direct recommends, cutting out the old bead and replacing it with fresh anti-fungal silicone sealant is often the only permanent fix. It's a 30-minute job with a craft knife, a caulking gun, and a tube of mould-resistant sealant - and it breaks the recontamination cycle for good.
Use this quick-reference list to match each material to its ideal cleaning agent - and the one product to steer clear of:
Treating the frame and seal correctly gets the mould off the hard surfaces - but what about the soft furnishings pressed right up against the glass? Curtains, blinds, and shutters create their own trapped micro-climates, and if they've been sitting against a mouldy window, they're almost certainly carrying spores too.
You've scrubbed the frame, replaced the silicone, and dried the sill - yet a musty smell lingers every time you draw the curtains. That's because mold on blinds, curtains, and shutters is the overlooked second front of any window mould problem. These furnishings sit millimetres from the glass, and if the window was colonised, the soft furnishings almost certainly picked up spores too.
Imagine sandwiching a piece of fabric between a cold, damp pane of glass and a warm room. That's exactly what happens when curtains are drawn or blinds are lowered at night. The window treatment traps a thin pocket of air against the glazing, restricting circulation and creating a micro-environment with sky-high humidity. Condensation wets the material directly - you'll notice it on the back of curtains or along the bottom edges of roller blinds where moisture collects.
The problem goes deeper than just dampness. A fine layer of organic dust - skin cells, cooking residue, textile fibres - naturally settles on slats, fabric weaves, and shutter louvres. Combined with trapped moisture and still air, this gives mould everything it needs to establish a colony without ever touching the window itself. Mold on window blinds is especially common in bathrooms and kitchens, where steam from showers and cooking vapour constantly feeds the humidity cycle.
Fabric roller blinds and curtains: Remove them and check the care label first. For machine-washable fabrics, add one cup of white vinegar to your regular detergent and wash at the highest temperature the material allows. Heat helps kill spores, but never tumble-dry until you're certain the mould is gone - heat can set stains permanently. Hang them in direct sunlight instead; UV rays kill remaining spores naturally and help bleach out discolouration.
For non-washable or delicate fabrics, vacuum both sides with a HEPA-filter vacuum on low suction to lift loose spores without pushing them deeper into the weave. Then lightly mist the affected areas with a solution of equal parts white vinegar and water - damp, not dripping - and air-dry fully in sunlight if possible. Fabrics that still smell musty after thorough treatment are likely compromised beyond recovery and should be replaced.
Venetian and aluminium blinds: These non-porous slats clean up more easily. Wipe each slat individually with a cloth dampened in undiluted white vinegar, working from top to bottom. Dry immediately with a separate cloth to prevent moisture sitting on the surface. Don't forget the headrail, lift cords, and tilt mechanisms - these overlooked areas harbour mould but rarely get cleaned.
Wooden shutters: Treat these the same way you'd treat timber window frames. Dampen a soft cloth in a mixture of one part vinegar to three parts water, wring it thoroughly, and wipe each louvre. Never soak wooden shutters - excess water swells the grain and creates fresh conditions for mould. Dry everything completely, and if the cleaning has damaged the paint or lacquer finish, lightly sand, prime with a mould-resistant primer, and reseal.
Mold on window screens is another frequently missed surface. If your windows have fitted fly screens or mesh panels, vacuum them with a brush attachment and wipe down with a vinegar-dampened cloth, paying attention to the frame edges where dust and moisture accumulate.
Cleaning mouldy blinds and curtains is wasted effort if they go straight back into the same stagnant, humid pocket against the glass. A few daily habits break the cycle and keep furnishings mould-free long after the initial clean:
Keeping furnishings clean and dry solves the immediate problem - but if the window behind them keeps producing condensation night after night, you're fighting a battle of attrition. The real long-term fix lies in tackling the moisture and airflow conditions that make your windows a mould-friendly environment in the first place.

Cleaning mould off a window is satisfying - for about a week. Then the familiar dark spots creep back, and you're reaching for the spray bottle again. The reason is simple: scrubbing treats the visible growth, but it does nothing about the moisture and stagnant air that invited the colony in the first place. Preventing black mold on window sills permanently means changing the conditions around your glazing so mould can't re-establish, no matter what the season throws at you.
Knowing how to clean mould around windows is useful, but knowing how to stop it appearing at all is far more valuable. The strategies below move from the most impactful structural change to the smallest daily habit - because genuine prevention works on every level simultaneously.
If you could make one single change to how to get rid of mold around windows for good, this would be it. Trickle vents are small, controllable openings integrated into the window frame head that allow a constant low-volume exchange of fresh air - even while the window itself stays closed and locked. They work passively, using natural pressure differences between indoors and outdoors to draw stale, moisture-laden air out and replace it with drier outside air. No electricity, no moving parts, no noise.
Why does this matter so much? Because trickle vents address the fundamental cause of mold around windows: trapped humidity with no escape route. Modern draught-proofed homes seal moisture inside, and relative humidity climbs into the mould-friendly zone above 60-70%. A continuously open trickle vent bleeds that excess moisture away before it ever condenses on glass. As ventilation research confirms, a family of four produces roughly 10 to 15 litres of water vapour daily - background ventilation gives that vapour somewhere to go other than your window sill.
The practical appeal is strong: trickle vents can be retrofitted to existing windows without replacing the entire unit, making them accessible for homeowners and landlords upgrading older properties. For readers exploring retrofit options, Shengxin Aluminium's Fresh Air Trickle Vent is a frame-integrated passive ventilation solution designed specifically for moisture-prone rooms like bedrooms, kitchens, and bathrooms. It provides continuous fresh air exchange without significant heat loss - exactly the kind of low-effort, high-impact measure that breaks the condensation cycle at its source.
The key habit? Leave trickle vents open. It sounds counterintuitive during cold months, but the minimal heat loss is vastly outweighed by the reduction in condensation and black mold around windows. Closing them traps moisture and recreates the sealed environment mould thrives in.
Trickle vents handle background ventilation, but high-moisture activities need targeted extraction. Bathroom and kitchen extractor fans should run for at least 15 minutes after showering or cooking - not just during the activity itself. The Guardian's condensation guide recommends keeping the bathroom door closed while running the fan so humid air vents outside rather than drifting into hallways and bedrooms where it condenses on cooler glazing overnight.
For rooms that remain persistently damp despite ventilation improvements - ground-floor bedrooms, north-facing rooms, or properties with limited window openings - a portable dehumidifier offers a direct line of defence. Modern units draw as little as 7p per hour to operate and many feature automatic humidity sensors that switch the machine on only when moisture levels climb above a set threshold. Place the dehumidifier centrally in the problem room with the door closed for the most efficient moisture extraction.
Heating strategy matters too. Intermittent blasts of high heat by long cold spells create exactly the temperature swings that drive condensation. When the heating clicks off, interior surfaces cool rapidly, and any moisture in the air condenses on the coldest point - your windows. A more effective approach is consistent, low-level background heating that keeps surfaces warm enough to stay above dew point, even overnight. This doesn't mean leaving the thermostat high; even a few degrees of steady warmth reduces condensation far more than dramatic on-off cycling.
Structural upgrades set the foundation, but what you do every day determines whether mould stays away. These habits cost nothing and take minutes:
Once ventilation and daily habits are in place, supplementary products can provide an extra layer of protection in stubborn problem areas. Anti-condensation paint - sometimes called thermal paint or insulating paint - contains hollow ceramic microspheres that raise the surface temperature of the wall or reveal it's applied to. A warmer surface means the air touching it is less likely to drop below dew point, so condensation forms less readily.
This paint works best on window reveals, the plaster surfaces immediately surrounding the frame, and exterior-facing walls in bedrooms where cold bridging is common. It's not a standalone solution - no coating can compensate for a sealed, unventilated room producing litres of moisture daily. But as a complement to open trickle vents, functioning extractors, and sensible daily habits, it adds a useful final layer of defence against recurring mould growth.
Prevention, in the end, is about stacking multiple small interventions: passive ventilation that runs 24 hours a day, targeted extraction during high-moisture activities, daily routines that keep surfaces dry, and surface treatments that raise the temperature threshold for condensation. Each layer reduces the risk individually; together, they make how to clean mould around windows a task you perform once rather than every week. But even the most thorough prevention plan has limits - and recognising when a problem has moved beyond DIY territory is just as important as knowing how to handle it yourself.
There's a point where even the best cleaning routine, the right agent, and solid daily habits simply aren't enough. Mouldy windows that keep deteriorating despite your best efforts are telling you something: the problem has outgrown household solutions. Equally important - and almost never discussed - is the question of responsibility when you're renting. Who pays for remediation? What are your rights? This section tackles both gaps head-on.
Most mold on windows falls into the mild or moderate range and responds well to DIY treatment. Professional help becomes essential when you cross certain thresholds:
What does professional remediation actually involve? Expect a sequence of containment (polyethylene sheeting to isolate the work area), HEPA vacuuming to capture loose spores, antimicrobial treatment of affected surfaces, and removal of materials too damaged to salvage - whether that's sections of timber framing, contaminated plasterboard, or degraded insulation. Reputable remediators will also identify and recommend fixes for the underlying moisture source, because without that step the window mold simply returns.
If you rent your home, mold in window sills raises a question that cleaning guides almost never address: whose problem is it? The answer depends on the cause, but the legal framework leans heavily in the tenant's favour when the building itself is at fault.
Landlords in England have a statutory duty under section 11 of the Landlord and Tenant Act 1985 to keep the structure and exterior of the property in repair - and that includes addressing dampness and mould caused by structural deficiencies, inadequate ventilation provision, or water ingress. Under the Housing Health and Safety Rating System (HHSRS), damp and mould growth is a defined hazard, and local authority environmental health officers can serve improvement notices on landlords who fail to act. Since October 2025, social landlords are additionally bound by Awaab's Law, which mandates fixed timeframes for addressing damp and mould hazards that present a significant risk of harm.
The situation becomes more nuanced when mould stems purely from occupant lifestyle - never opening a window, blocking trickle vents, or routinely drying laundry indoors without extraction. Landlords may argue contributory behaviour in these cases. That said, if the property lacks adequate ventilation provision in the first place - no trickle vents, no extractor fans, poor thermal performance - the root cause is structural, and the responsibility falls back on the landlord.
Practical steps for tenants dealing with persistent mold on windows:
Whether you own or rent, knowing how to get rid of window mold permanently means looking past the spray bottle and toward the building envelope. Sustainable mould prevention often requires a combination of upgrades that, together, eliminate the moisture-ventilation imbalance at its source:
Each of these measures chips away at the conditions mould depends on. Alone, any single fix helps. Combined, they transform a window zone from a fungal habitat into a dry, well-ventilated surface where spores land but simply cannot grow.
Black mould on windows is always a signal - addressing the signal means fixing the moisture source, not just scrubbing the surface.
Yes, it can be. While the species typically found on windows - Aspergillus niger, Cladosporium, and Penicillium - are not the feared toxic Stachybotrys, they still release airborne spores and microbial volatile organic compounds that trigger allergic rhinitis, persistent coughing, wheezing, eye irritation, and skin rashes. Young children, elderly people, asthma sufferers, and immunocompromised individuals face the highest risk. Bedroom exposure is especially concerning because sleepers inhale spores continuously for hours at sill level. If respiratory symptoms worsen at home but improve when you leave, consult a healthcare professional promptly.
The most effective approach depends on the surface material. For uPVC and glass, spray undiluted white vinegar or 3% hydrogen peroxide, allow the full dwell time (60 minutes for vinegar, 10-15 minutes for peroxide), then scrub with a stiff nylon brush and wipe clean with a microfibre cloth. For silicone seals with deep staining, apply a paste of baking soda and hydrogen peroxide, cover with cling film, and leave overnight. If staining returns quickly, cut out the old silicone and replace it with fresh anti-fungal sealant. Always wear an FFP2/N95 mask, gloves, and eye protection, and ventilate the room during cleaning.
Recurring mould means the underlying moisture-ventilation imbalance has not been resolved. Warm, humid indoor air meets cold glazing, condensation pools on sills and seals, and mould spores recolonise the damp surface within days. Common culprits include sealed trickle vents, absent or undersized extractor fans, indoor laundry drying, and airtight modern homes that trap moisture. Permanent prevention requires reducing indoor humidity through background ventilation - such as frame-integrated trickle vents like Shengxin Aluminium's Fresh Air Trickle Vent - running extractors after cooking and bathing, and wiping condensation from glass every morning.
Mould cannot feed directly on glass or aluminium because neither material is organic. However, a thin film of household dust, skin cells, and cooking residue settles on these surfaces and provides enough organic matter for mould to colonise. So you will see dark growth on glass panes and aluminium profiles, but the fungus is feeding on the debris layer rather than the material itself. This makes cleaning straightforward - a mild detergent or undiluted white vinegar removes both the organic film and the mould. Focus extra attention on rubber gaskets and thermal break areas within aluminium frames, as these porous components trap moisture and harbour deeper growth.
In most cases, yes - if the mould results from structural issues, inadequate ventilation provision, or water ingress. Under section 11 of the Landlord and Tenant Act 1985, landlords must maintain the structure and exterior in repair, and damp and mould is a recognised hazard under the Housing Health and Safety Rating System. Document the problem with dated photos, report it in writing via email for a paper trail, and request a local authority environmental health inspection if your landlord does not act. Organisations such as Shelter and Citizens Advice offer free guidance on tenant rights. The situation is more nuanced only when mould stems purely from occupant behaviour in a property that already has adequate ventilation.



 Servicio en línea
 0086 136 3563 2360
 sales@sxalu.com
 +86 136 3563 2360
 español
 English
 français
 Deutsch
 русский
 português
 العربية
 ไทย
ไทย Việt
Việt Українська